
Introduction
The white keys on the piano represent the "natural" notes in our Western musical alphabet. When played from right to left(ascending) from the notes "C' to "C", it becomes a C major scale which contains no sharp(#) or flat(b) notes. If we observe the white keys on the piano, we can notice some patterns:
a). The blocks of 3 keys that contain the notes C, D, E (notice the black keys in between)
b). The blocks of 4 keys that contain the notes F, G, A, B (notice the black keys in between)
c). Two sets of 2 keys that do not have a black key in between them (B-C, E-F)
Familiarize yourself with the above patterns on the piano diagram. If you have a piano handy, play them and identify those notes there. An added benefit is that you learn something about piano.
The Objective
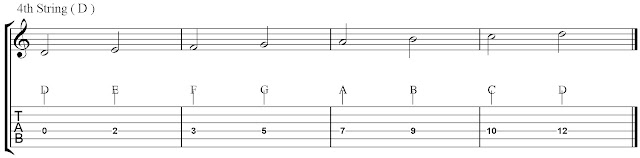
Below are the note patterns for all the "natural" notes(same as white keys on piano) on each string. Our objective is to see each individual string(from the "open" to the 12th fret octave) on the guitar neck as easily as we can see the note patterns on the piano keyboard. Practice ONE string at a time until you can see, play, and name the notes with ease.
Step 1. Learn the note locations by playing the entire pattern of natural notes repeatedly, both ascending and descending(up and down), from the "open" string to the 12th fret(octave). Memorize the pattern.
Step 2. Locate the "half-step" note blocks on chosen string (E-F, B-C) and memorize their locations
Step 3. Locate notes in the "whole-step" block, containing the notes F-G-A-B, on chosen string.
Step 4. Locate notes in the "whole-step" block, containing the notes C-D-E on chosen string
Step 5. Use "Random Notes" section below to drill yourself on note memorization on each string
Step 6. Improvise melodies on one string OR in combinations of adjacent strings, limiting yourself to the notes we are working on.
I highly recommend committing yourself to learning this immediately. This will help you develop an awareness of note locations throughout your guitar neck and enhance your ability to play musical ideas in different positions and registers.
(Click on each string example to enlarge image)




Random Note Drills
(Pick a string, pick a line....go!)
C F B D G E A B F A C E D G B A C D G F E A
G D F A E D F A C E D F A B D F G B D C E A
D F G B D C E F A B D F C E C B F E G A B D
E G B D F A C E G A C E D G C F B E A D G B
A D G C F B E A C E G B D G A F E C E D G E
B D A C E F G D C E G B D F B A C G F A B D
C G D A E B F B E A D G C E G B D F A F D B
B G E C A F D C B A G F E A D G B D C F B E


