Hey All,
Here we are...finally!!! So this blog is dedicated to guitar tutorials from beginning to advanced levels. Tutorials will focus on fretboard organization, techniques for generating harmony and melody, composition, improvisation, and other musical concepts to help improvisers, songwriters, and composers expand their approach to the guitar.
You can go to the "Tutorials" tab above to check out the first few tutorials. All of the material is notated in treble clef and also has TAB for fingering, positions, etc.. I will be adding more chapters to them as well as additional topics as we move forward.
I encourage you to play through this stuff, study the contents and the logic, and figure out where it fits in to your own creative process. My hope is that the tutorials will help break you out of any "default settings" on the guitar in order for you to further investigate the instrument, realize more possibilities, and expand your capacity for generating music.
As with anything that is music-related, this blog is a work in progress so I am open to any feedback, questions, and requests. Please feel free to e-mail me HERE if you have any.
I also encourage you to "like" Guitariosity on Facebook and follow on Twitter
A very special thanks to Kristin Bach for lending her feedback and talent for the details. Also, a special thanks to Kiranda Mays for coming up with the idea for the blog and for the layout.
Happy Guitar Playing!!!!
Zachary
Thursday, July 25, 2013

Friday, June 21, 2013
The Basics: Learn Your Triads PART 2: Second Set of Three Adjacent Strings
Things to study within each example below:
1. Within each triad inversion, make sure you memorize which note is the "root". What finger and on what string, is playing the root? Sing the root while you play the chord. (note: this will also be required for transposing to different keys)
2. Within each inversion, memorize where the "3rd" and "5th" are within the voicing. Sing them while you play the chord.
3. Notice the pattern of rotation of tones moving from one inversion to the next. What note (Root, 3rd, or 5th) is on the bottom? What note is on top?
Ex 1. shows a major triad in closed root position, and it's two inversions. For range purposes, the 1st Inversion and 2nd Inversion are voiced lower than the Root Position on this set of strings.
Ex. 1.5 shows the 1st Inversion transposed up an octave. Later on, we will use this shape and fingering for moving the 1st Inversion major up and down the fretboard


Ex.2 shows a minor triad in closed root position, and it's two inversions. Ex. 2.5 shows the 1st Inversion transposed up an octave on the same three adjacent strings. Later on, we will use the fingering in 2.5 for moving the 1st Inversion minor up and down the fretboard.


Ex.3 shows a diminished triad in closed root position, and it's two inversions. You know what to do.

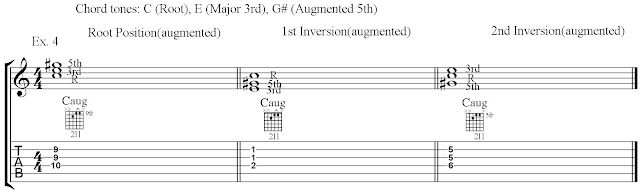
Ex. 4 shows an augmented triad in closed root position, and it's two inversions. Ex 4.5 shows the 1st Inversion transposed up an octave. Notice how all of the chord voicings are the same shape and fingering. Also notice how the root, 3rd, and 5th shift through each voicing.

Thursday, June 6, 2013
Extend That Lick!
This segment is going to focus on transposing short melodic motifs through different registers in order to combine them into forming longer phrases.
Before you get into this one, I would recommend you get well acquainted with knowing your octaves in Octave Fingerings and Fretboard Awareness if you haven't already. For now, I am going to keep things simple by starting the melodic motifs from the tonal center ( G ). Later on, we will practice this concept in different keys or tonal centers, string sets, and with the motifs starting on notes other than the tonal center (or "root" if you prefer to call it that).
Ex.1 is the note G (tonal center) located on the 6th string/3rd fret and it's octave (G8) on the 4th string/5th fret. Ex.2 is a simple blues-based lick in the key of G starting on G. Play this lick and get it under your fingers and in your ears. Ex. 3 is the exact same lick only it is transposed an octave higher, starting on G8. Play Ex.2 and Ex.3 back and forth and get a good feel for them in both registers.

Okay, so now that you have these down, check out Ex.4. Here, I took Ex.2 and Ex.3 and created an extended phrase by putting the two together. Notice how the two intersect to form a longer melody. Notice
where the tonal centers( G ) are.

Here's the same concept only now it is 3 octaves in range. Ex.5 shows our tonal center and octave range. Ex.6 is another blues-based lick in the key of G starting from the highest G. Ex.7 is the same lick and octave lower and Ex.8 is a longer melody as a result of combining Ex.6 and Ex.7. Notice where they intersect.

Ex.9 shows our (tonal center) and range. Ex.10 is a short melodic motif and Ex.11 is the same motif transposed up an octave. Ex.12 shows an example of an ascending line by combining Ex.10 and Ex.11.

There will be more on this subject in the future so stay tuned!
Before you get into this one, I would recommend you get well acquainted with knowing your octaves in Octave Fingerings and Fretboard Awareness if you haven't already. For now, I am going to keep things simple by starting the melodic motifs from the tonal center ( G ). Later on, we will practice this concept in different keys or tonal centers, string sets, and with the motifs starting on notes other than the tonal center (or "root" if you prefer to call it that).
Ex.1 is the note G (tonal center) located on the 6th string/3rd fret and it's octave (G8) on the 4th string/5th fret. Ex.2 is a simple blues-based lick in the key of G starting on G. Play this lick and get it under your fingers and in your ears. Ex. 3 is the exact same lick only it is transposed an octave higher, starting on G8. Play Ex.2 and Ex.3 back and forth and get a good feel for them in both registers.
Okay, so now that you have these down, check out Ex.4. Here, I took Ex.2 and Ex.3 and created an extended phrase by putting the two together. Notice how the two intersect to form a longer melody. Notice
where the tonal centers( G ) are.
Here's the same concept only now it is 3 octaves in range. Ex.5 shows our tonal center and octave range. Ex.6 is another blues-based lick in the key of G starting from the highest G. Ex.7 is the same lick and octave lower and Ex.8 is a longer melody as a result of combining Ex.6 and Ex.7. Notice where they intersect.
Ex.9 shows our (tonal center) and range. Ex.10 is a short melodic motif and Ex.11 is the same motif transposed up an octave. Ex.12 shows an example of an ascending line by combining Ex.10 and Ex.11.
This concept of extending melodic motifs through octaves can work for other tonalities too. Practice this concept by coming up with a short melodic idea and transposing it into higher or lower registers. Once you have a feel for it, try combining the motifs from different registers to form longer lines. Try forming both ascending and descending lines with the same melodic motif and creating different variations.
There will be more on this subject in the future so stay tuned!
Wednesday, June 5, 2013
The Basics: Learn Your Triads PART 1: The First Set of 3 Adjacent Strings
A triad is a 3 note chord. In this part, we are going to focus on learning four basic triad types, which are major, minor, diminished, and augmented. We are going to focus on learning these triads on the first set of three adjacent strings in a couple of different inversions. To keep things simple, we will build all of the triads from the same "root note" ( C ) for comparison, contrast, and analysis. Later on, all of these triads will be transposed to other "keys".
Triads are the most commonly used chords and I would recommend getting a solid grasp on this material as it will be very useful, both harmonically and melodically, in a number of ways.
Things to study within each example below:
1. Within each triad inversion, make sure you memorize which note is the "root". What finger and on what string, is playing the root? Sing the root while you play the chord. (note: this will also be required for transposing to different keys)
2. Within each inversion, memorize where the "3rd" and "5th" are within the voicing. Sing them while you play the chord.
3. Notice the pattern of rotation of tones moving from one inversion to the next. What note is on the bottom? What note is on top?
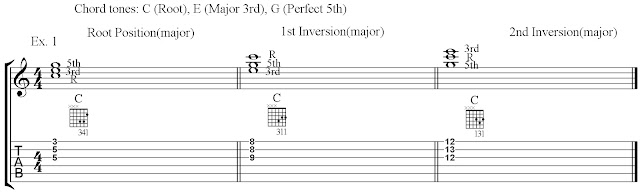
Ex 1. shows a major triad in closed root position, and it's two inversions. Practice and commit all of the material below to memory. Practice moving in between each inversion until it is seamless.

Ex.3 shows a diminished triad in closed root position, and it's two inversions. Practice and commit all of the material below to memory. Practice moving in between each inversion until it is seamless. Compare the diminished triad to the minor triad in Ex.2.

Ex. 4 hows an augmented triad in closed root position, and it's two inversions. Practice and commit all of the material below to memory. Practice moving in between each inversion until it is seamless. Compare the augmented triad to the major triad in Ex.1. Do you notice anything about the fingerings for all the inversions in Ex.4 below?

There will be more to come on this subject, including learning these on other sets of adjacent strings. Once you get these under your fingers and in your ears, check out Harmonizing Melody with Chords PART 1: Diatonic Triads
Triads are the most commonly used chords and I would recommend getting a solid grasp on this material as it will be very useful, both harmonically and melodically, in a number of ways.
Things to study within each example below:
1. Within each triad inversion, make sure you memorize which note is the "root". What finger and on what string, is playing the root? Sing the root while you play the chord. (note: this will also be required for transposing to different keys)
2. Within each inversion, memorize where the "3rd" and "5th" are within the voicing. Sing them while you play the chord.
3. Notice the pattern of rotation of tones moving from one inversion to the next. What note is on the bottom? What note is on top?
Ex 1. shows a major triad in closed root position, and it's two inversions. Practice and commit all of the material below to memory. Practice moving in between each inversion until it is seamless.
Ex.2 shows a minor triad in closed root position, and it's two inversions. Practice and commit all of the material below to memory. Practice moving in between each inversion until it is seamless. Notice the difference compared to the major triad in both structure and sound.
Ex.3 shows a diminished triad in closed root position, and it's two inversions. Practice and commit all of the material below to memory. Practice moving in between each inversion until it is seamless. Compare the diminished triad to the minor triad in Ex.2.
Ex. 4 hows an augmented triad in closed root position, and it's two inversions. Practice and commit all of the material below to memory. Practice moving in between each inversion until it is seamless. Compare the augmented triad to the major triad in Ex.1. Do you notice anything about the fingerings for all the inversions in Ex.4 below?
There will be more to come on this subject, including learning these on other sets of adjacent strings. Once you get these under your fingers and in your ears, check out Harmonizing Melody with Chords PART 1: Diatonic Triads
Thursday, May 23, 2013
Harmonizing Melody With Chords PART 1: Using Triads on First Set of 3 Adjacent Strings
Introduction
In this segment, we are going to cover some basic techniques in harmonizing melody by voicing chords(in this case, triads) underneath our melody notes. A familiarity with triads, major scales, and the notes on your strings can be very helpful in comprehending and applying this concept. I recommend familiarizing yourself with the single-string approach and the triad lessons in this blog first so that you can grasp this material more easily.
For the sake of practice, we will start by limiting ourselves to 3 things:
1.) Notes of the C major scale on the 1st string. These will be designated for melody
2.) The 7 diatonic triads within the key of C major ( C, Dm, Em, F, G, Am, Bdim)
3.) Just the first 3 adjacent strings on the guitar (1st, 2nd, and 3rd) in standard tuning.
In Ex.1, is a C major scale played on the 1st string from the open string to the 12 fret from the "E" to "E". Play the scale tones in Ex. 1, ascending and descending, until you are comfortable with the locations and the names of the tones. Sing them so that you get a good aural feel for them.We are going to take these scale tones and harmonize them in a few variations using basic diatonic triads. Eventually, we will use these scale tones to build melodies and harmonize them with chords.

As you work through each example, you should do two things to make yourself aware of what's happening in this process: 1.) Sing the scale tones that you are harmonizing and 2.) Always be aware of what chord (Dm, F, Am, etc.) you are harmonizing with. Practice each example until you can play them comfortably, ascending and descending.


Another way of perceiving this material is to look at one scale tone and harmonize it with all 3 diatonic triads shown in Ex. 5 and Ex.6 below. Sing the top tone and play through each harmonization. What do you notice?

Alright, so now that we have some familiarity with the scale tones, chord shapes, and the harmonizations from the above examples, let's look at some examples of how we can take a melody and harmonize it in a couple different ways by using the material from above
We are going to use this short melodic phrase in Ex. 7 as our guinea pig . Play this phrase, sing it, and get it in your ear. In Ex. 8, I harmonized the phrase only using the three major chords in the key (C, F, G). In Ex.9, I used only the 3 minor chords in the key. For Ex.10 and Ex.11, I used a mix of the two.

Exercise: Now try your own. Compose a simple melody using 3 or 4 notes in Ex.1. Once you have your melody/note choices down, try harmonizing each of your notes with any of their three options provided in Ex.2 - Ex.4. Practice playing your melody as chords and singing the melody as you play. Notice how the "color" or character of your melody changes as you use different chord options.
Remember, their is plenty more possibilities for harmonizing these melody notes but for now, we will limit ourselves to these until they are internalized in our musical minds.
Wednesday, May 15, 2013
Tonality Experiment PART 2
Dig This
The examples below show how we can take some of the interval combinations in PART 1 and extend them up another octave to create a larger melodic structure with more range. Play and study the examples below. Notice how Ex.1 is in intervals of minor 3rds (C to Eb, F# to A) and Ex.2 is in intervals of major 3rds (C to E, F# to A#). After you get the hang of this, try some of the other interval combinations from PART 1 and extend them another octave or more. Remember to be creative with this material. You're a kitty. This is a ball of yarn. GO!

Okay so now that you have messed around with extending these figures up past the octave, let's see what happens when we add even more intervals into the equation.
Ex. 3, we now have 3 notes (a minor 2nd and a major 2nd) from each fundamental. I highlighted them by dividing the note groupings into eighth-note triplets and also showed how you can play it as a descending line.
Ex. 4 shows how we can play a different permutation of these 3-note figures by playing them in different orders. Notice how in this one, the permutations are the same from both fundamentals.
side note: try changing the permutations from each fundamental to where you have alternating permutations
Ex. 5 shows a 4-note figure with a permutation. This one starts with the fundamental, skips to the highest note in the grouping, and then descends (root - perfect 5th - minor 3rd - minor 2nd). Do you get a sense of where this is all going? See and/or hear some possibilities?

The possibilities are endless if you use the logic behind these examples. Come up with your own and create ideas for new compositions or platforms for improvisation. Go!!!
Tonality Experiment PART 1
Introduction
The examples below are ways to experiment with tonality. In this case, I am defining tonality as the grouping of tones that establishes a tonal relationship, both melodic and harmonic, that characterizes a particular sound, mood or color. When we create tonality, we most often hear (consciously or subconsciously) a "root note" or tonal center in which all of the other notes have a relationship to, hearing the sum of those parts just as our eyes perceive combinations of color. The tonal center is our resting point or "home".
At the top, you will notice three fundamental tones: C, F#, and the octave C with C functioning as our tonal center. The tone F# is exactly half way between C and the octave C.
The examples below that are different interval combinations from each fundamental tone. The sounds of the interval combinations between the root, the tritone and the octave will produce different tonalities and possibilities for melodic figures and ideas.

Hint: Try altering these combinations by changing the order of the notes, and playing different rhythms. Play them backwards... get freaky with it!!!
Side note: This concept is based off material in from the book "Thesaurus of Scales and Melodic Patterns" by Nicolas Slonimsky. I highly recommend this book. Play around with these and then check out Tonality Experiment PART 2
Subscribe to:
Posts (Atom)